A Revit project file contains the whole job. Every sheet, every view, and every schedule. To get more than one person working on this single file you need to enable worksets. The idea is that a Central file will sit on a shared network drive and anybody that needs access to this file actually works on a copy that is their Local file. The central and local files can be synced on demand. When work is being done in a local file it locks down that workset or element in the central file to prevent other users from effecting the same parts of a single model simultaneously. When a users finishes work they should relinquish locked down items.
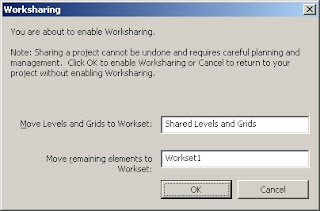
Until worksets are enabled a Revit file is a stand alone file. Once worksets are enabled, it can not be undone.
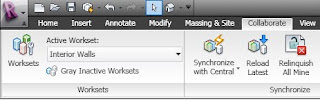
To enable worksets select the Worksets tool from the Collaborate tab of the ribbon.
The Worksharing dialog appears telling you that the project will be broken into two worksets; Shared levels and Grids, and Workset1. I usually rename workset1 to something that makes sense for me like "Interior Walls".
In the next dialog more worksets can be created like "Exterior Walls" or "West Wing" or "1st Floor Interiors". The logic of the worksets should be based on who needs to do what. If Jeff needs to work on the restrooms alone, make a "restrooms" workset for him.
The active workset shown in the collaborate tab is analogous to the current layer in AutoCAD. Every object placed in the model will belong to that workset. If an object has been placed in the wrong workset, it can be corrected in it's instance properties.
When this file is saved for the first time it will recognize it's self as a central file. Click OK when the dialog pops up to tell you this is now a central file. After a save and close the next time a user opens this file it will automatically choose to create a new local file for the user.
 The local file is typically stored in "My Documents" by default.
Here is a picture of Dan Karnes

No comments:
Post a Comment