There will be times when a remodel project was originally done in MicroStation, or the consultant on the project is using AutoCAD, or maybe its a Revit team. In all of these cases, it's good to know how to link or insert other files into a Revit project, and the best practices for doing so.
All linking and inserting can be done fron the Insert tab of the ribbon.
Linking another Revit file
Linking a Revit file creates a conection where the linked file can be viewed in the host file. This dynamic link updates when the host file is opened or when the link is manually updated. To link a Revit file, select the Revit Link tool from the Insert tab of the ribbon. Browse to the desired Revit project file. Select the positioning desired. I reccommend Orgin to Orgin as shown below. When Linking Revit files.
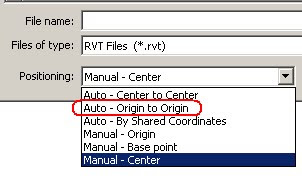
Linking a Revit file creates a conection where the linked file can be viewed in the host file. This dynamic link updates when the host file is opened or when the link is manually updated. To link a Revit file, select the Revit Link tool from the Insert tab of the ribbon. Browse to the desired Revit project file. Select the positioning desired. I reccommend Orgin to Orgin as shown below. When Linking Revit files.
Linking a CAD File
Linking a CAD file like a DWG, DGN, DXF or a SKP creates a conection where the linked file can be viewed in the host file. This dynamic link updates when the host file is opened or when the link is manually updated. To link a CAD file, select the CAD Link tool from the Insert tab of the ribbon. Browse to the desired CAD file. Select the positioning desired, the layers (or levels) to bring into the host file, and decide whether to keep the CAD file colors as are in CAD, Invert them, or convert them to black and white. Lastly choose if the linked CAD file will be visible only in the current view or all views and choose the orient to view check box if placing in a 3D view.
Linking a CAD file like a DWG, DGN, DXF or a SKP creates a conection where the linked file can be viewed in the host file. This dynamic link updates when the host file is opened or when the link is manually updated. To link a CAD file, select the CAD Link tool from the Insert tab of the ribbon. Browse to the desired CAD file. Select the positioning desired, the layers (or levels) to bring into the host file, and decide whether to keep the CAD file colors as are in CAD, Invert them, or convert them to black and white. Lastly choose if the linked CAD file will be visible only in the current view or all views and choose the orient to view check box if placing in a 3D view.
Insert a CAD File
Inserting a CAD file like a DWG, DGN, DXF or a SKP drops the CAD file as is into the host file. There is no dynamic link so it will not update in the host if change in the original file. To insert a CAD file, select the Import CAD tool from the Insert tab of the ribbon. Browse to the desired CAD file. Select the positioning desired, the layers (or levels) to bring into the host file, and decide whether to keep the CAD file colors as are in CAD, Invert them, or convert them to black and white.
Inserting a CAD file like a DWG, DGN, DXF or a SKP drops the CAD file as is into the host file. There is no dynamic link so it will not update in the host if change in the original file. To insert a CAD file, select the Import CAD tool from the Insert tab of the ribbon. Browse to the desired CAD file. Select the positioning desired, the layers (or levels) to bring into the host file, and decide whether to keep the CAD file colors as are in CAD, Invert them, or convert them to black and white.
Insert an Image
Inserting a image file like a JPG, PNG, or a BMP drops the image file as is into the host file. There is no dynamic link so it will not update in the host if change in the original file. To insert a image, select the Image tool from the Insert tab of the ribbon. Browse to the desired image file. Select the positioning desired.
Inserting a image file like a JPG, PNG, or a BMP drops the image file as is into the host file. There is no dynamic link so it will not update in the host if change in the original file. To insert a image, select the Image tool from the Insert tab of the ribbon. Browse to the desired image file. Select the positioning desired.
I'm having a problem with inserting images into revit 2014, the images insert fine but after I save the file and synch with central model the image inverts and I can't make it display properly. Any ideas on how to fix this?
ReplyDelete